Key Lime Pie Truffles: The Easiest (and Most Delicious) Easter Dessert You’ll Ever Make!

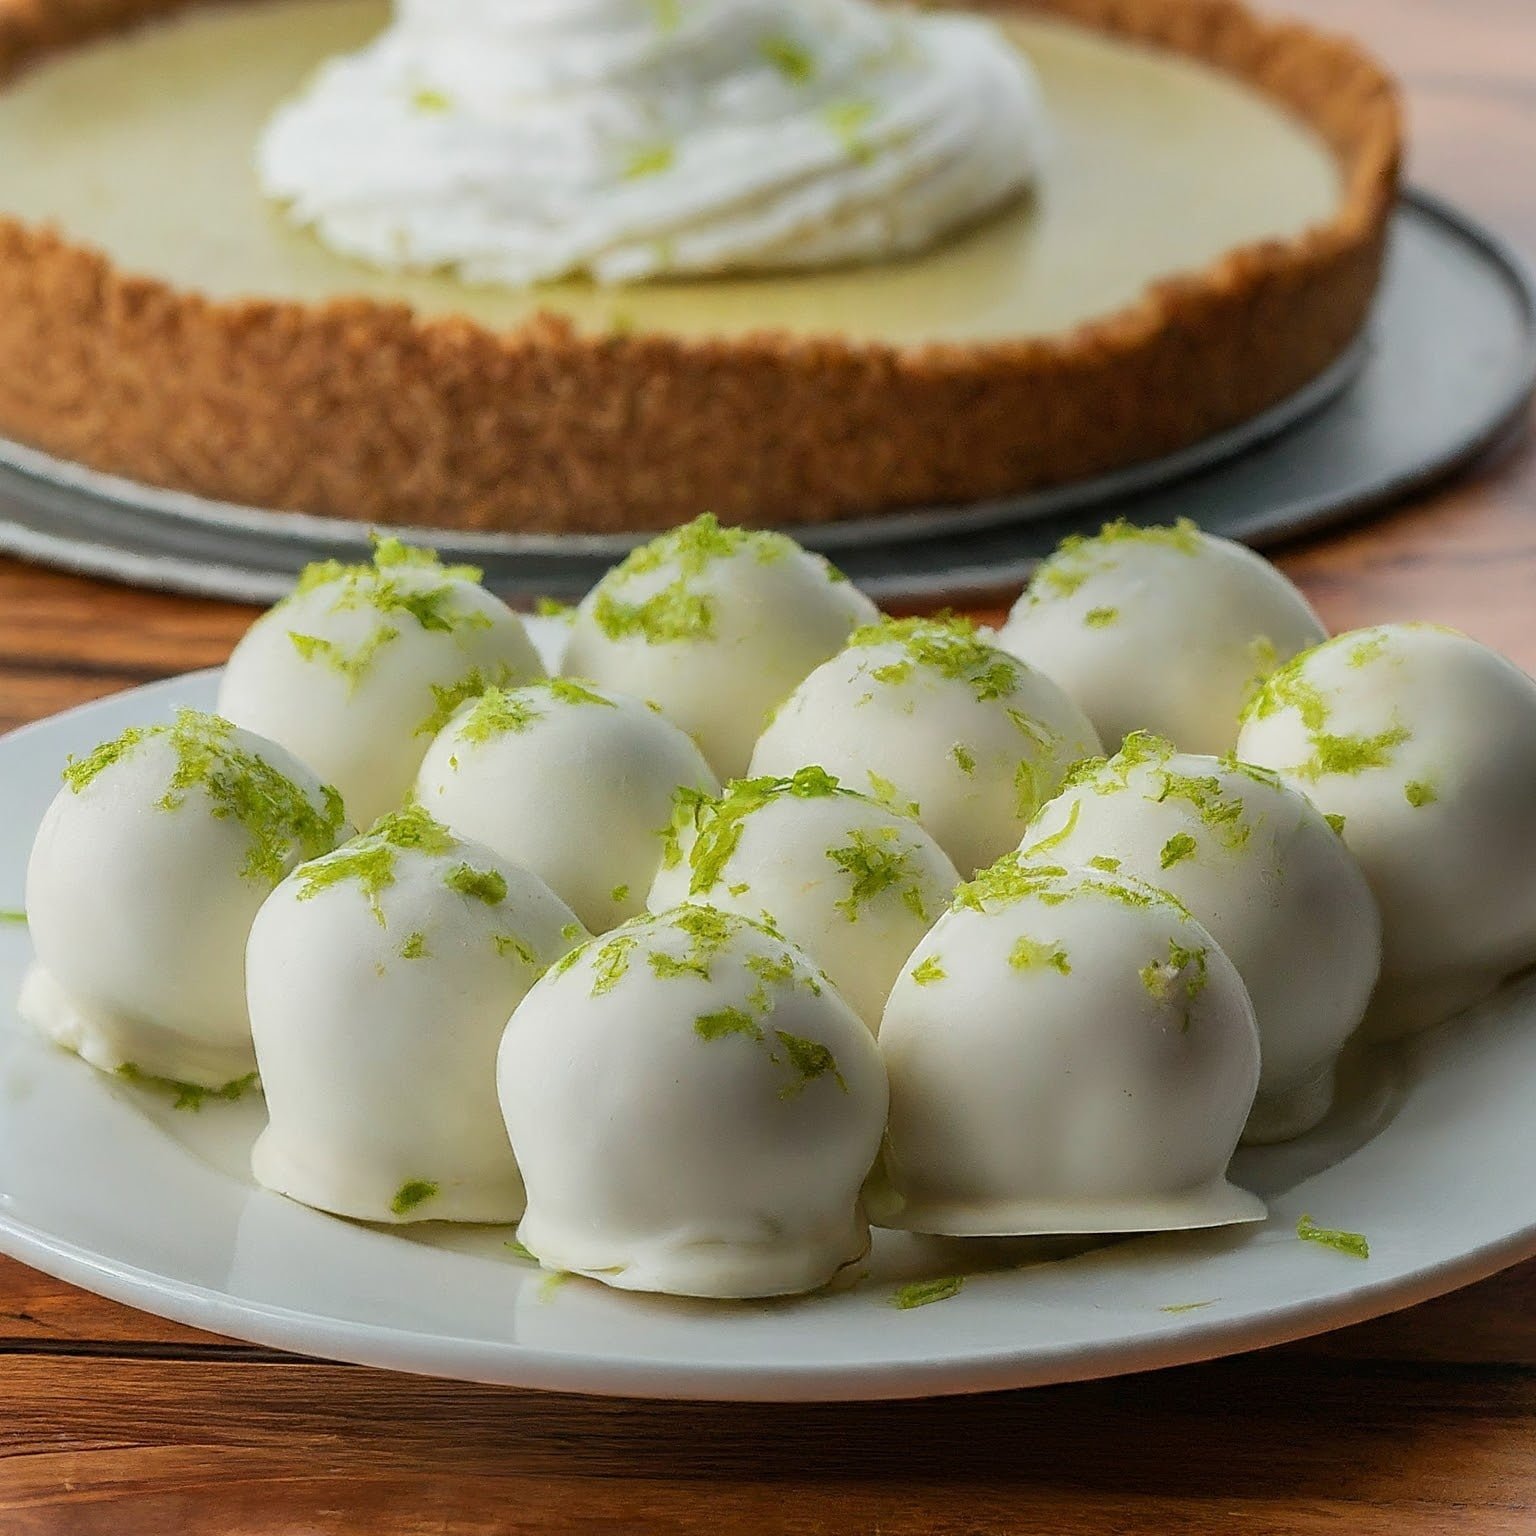
Get ready to add a touch of sunshine to your Easter table with these Key Lime Pie Truffles. They’re bursting with the bright, tangy flavor of key limes and have a creamy, melt-in-your-mouth center that’s dipped in decadent white chocolate. Plus, they’re incredibly easy to make – perfect for beginner bakers or when you’re short on time!

Ingredients:

  • 4 ounces cream cheese, softened
  • Zest and juice of 2 limes
  • 2 tablespoons sweetened condensed milk
  • 1 cup graham cracker crumbs
  • 1 bag (12 ounces) white chocolate chips
  • Lime zest, for garnish (optional)

Instructions:

  1. Prep the truffle mixture: In a large bowl, combine the softened cream cheese, lime zest, lime juice, and sweetened condensed milk. Using a hand mixer or electric mixer, beat until smooth and creamy.
  1. Add the crunch: Gently fold in the graham cracker crumbs until just combined. Be careful not to overmix, as you don’t want the crumbs to break down completely.
  1. Chill and roll: Cover the bowl with plastic wrap and refrigerate the truffle mixture for at least 30 minutes, or until firm enough to roll.
  1. Shape the truffles: Scoop out heaping tablespoons of the chilled mixture and roll them into 1-inch balls using your hands.

Tip: If the mixture is too sticky, you can moisten your hands slightly with water to prevent sticking.

  1. Melt the chocolate: Place the white chocolate chips in a heat-resistant bowl set over a pot of simmering water (make sure the bottom of the bowl doesn’t touch the water). Stir constantly until the chocolate is melted and smooth.
  2. Dip and decorate: Using a fork or dipping tool, carefully dip each truffle into the melted white chocolate, letting any excess drip off. Place the dipped truffles on a parchment paper-lined baking sheet.
  3. Garnish and chill: Before the chocolate sets, sprinkle the truffles with additional lime zest for a pop of color and flavor (optional). Refrigerate the truffles for at least 30 minutes, or until the chocolate is completely hardened.

Serve and enjoy!

These Key Lime Pie Truffles are best served chilled, straight from the refrigerator. They’re sure to be a hit with everyone at your Easter gathering!

Tips:

  • For a richer flavor, use full-fat cream cheese.
  • If you don’t have graham cracker crumbs, you can crush graham crackers in a food processor or blender.
  • You can store leftover truffles in an airtight container in the refrigerator for up to 5 days.
  • Get creative with your toppings! Try drizzling the truffles with melted dark chocolate, sprinkling them with chopped nuts, or rolling them in colored sprinkles.

With their vibrant flavors and easy preparation, these Key Lime Pie Truffles are the perfect way to add a touch of fun and festivity to your Easter celebration. So grab your ingredients, whip up a batch, and enjoy!

The Creamiest, Dreamiest Blueberry Cheesecake Ice Cream: The Perfect Easter Treat!

Spring has sprung, and Easter is hopping right around the corner! What better way to celebrate than with a dessert that’s both delicious and delightful? This Blueberry Cheesecake Ice Cream is the perfect combination of creamy cheesecake and sweet, tart blueberries, all swirled together in a dreamy frozen treat.

It’s so easy to make, and it’s sure to be a hit with everyone at your Easter gathering.

Ingredients:

  • 1 cup fresh or frozen blueberries
  • 1/4 cup granulated sugar
  • 1 tablespoon lemon juice
  • 8 ounces cream cheese, softened
  • 1/2 cup sour cream
  • 1/2 cup granulated sugar
  • 1 teaspoon vanilla extract
  • 1 cup heavy cream
  • 1 cup milk

Instructions:

1. Make the Blueberry Swirl: In a small saucepan, combine the blueberries, sugar, and lemon juice. Cook over medium heat, stirring occasionally, until the blueberries burst and the mixture thickens, about 5-7 minutes. Set aside to cool.

2. Whip Up the Creamy Base: In a food processor, blend together the cream cheese, sour cream, sugar, and vanilla extract until smooth and creamy.

3. Combine and Churn: In a large bowl, whisk together the heavy cream and milk. Add the cheesecake mixture and cooled blueberry mixture, and stir to combine. Pour the mixture into your ice cream maker and churn according to the manufacturer’s instructions.

4. Freeze and Enjoy! Once churned, transfer the ice cream to an airtight container and freeze for at least 4 hours, or until firm.

Tips:

  • For an extra crunchy topping, crumble some graham crackers or your favorite cookies over the ice cream before serving.
  • If you don’t have an ice cream maker, you can still freeze the mixture in an airtight container. However, you’ll need to stir it every few hours to prevent ice crystals from forming.
  • This ice cream is best enjoyed within a week of freezing.

This easy and delicious Blueberry Cheesecake Ice Cream is sure to be a crowd-pleaser at your Easter gathering!

With its creamy cheesecake base, sweet and tart blueberry swirl, and optional crunchy topping, it’s the perfect way to celebrate spring and Easter.

So why not give this recipe a try? You won’t be disappointed!

Happy Easter!

Hop into Spring with Adorable Gingerbread Bunny Cookies!

Spring has sprung, and what better way to celebrate than with adorable and delicious Gingerbread Bunny Cookies? These delightful treats are perfect for Easter festivities, springtime gatherings, or simply a fun baking activity with the kids.

They’re surprisingly easy to make and require only a handful of pantry staples. Plus, decorating them is a blast, allowing you to unleash your creativity and personalize each bunny to your liking.

So, gather your ingredients, preheat your oven, and get ready to bake up a batch of these irresistible springtime cookies!

Ingredients:

  • 1 1/2 cups all-purpose flour
  • 1 teaspoon ground ginger
  • 1/2 teaspoon ground cinnamon
  • 1/4 teaspoon ground nutmeg
  • 1/4 teaspoon salt
  • 1/2 cup unsalted butter, softened
  • 1/2 cup granulated sugar
  • 1 large egg
  • 1/4 cup molasses

Decorating:

  • Powdered sugar
  • Milk or water
  • Food coloring (optional)
  • Sprinkles, candy eyes, or other decorations (optional)

Instructions:

1. Preheat and Prep:

Preheat your oven to 350°F (175°C) and line baking sheets with parchment paper.

2. Dry Ingredients:

In a medium bowl, whisk together the flour, ginger, cinnamon, nutmeg, and salt. Set aside.

3. Cream Butter and Sugar:

In a large bowl, cream together the softened butter and sugar until light and fluffy.

4. Add Egg and Molasses:

Beat in the egg until well combined. Then, stir in the molasses until fully incorporated.

5. Combine Wet and Dry Ingredients:

Gradually add the dry ingredients to the wet ingredients, mixing until just combined. Be careful not to overmix.

6. Chill the Dough:

Wrap the dough in plastic wrap and refrigerate for at least 30 minutes. This step helps the dough firm up and prevents the cookies from spreading too much during baking.

7. Roll and Cut:

On a lightly floured surface, roll out the dough to a thickness of about 1/4 inch. Use a bunny-shaped cookie cutter to cut out shapes.

Tip: If the dough is sticky, dust it with a little more flour. However, be careful not to add too much flour, as it can make the cookies tough.

8. Bake:

Transfer the cookie cutouts to the prepared baking sheets, leaving a little space between them. Bake for 8-10 minutes, or until the edges are lightly golden brown.

9. Cool Completely:

Let the cookies cool completely on the baking sheets before decorating.

10. Decorate!

Now comes the fun part: decorating!

Icing:

To make simple icing, whisk together powdered sugar with milk or water until it reaches a smooth, pipeable consistency. You can adjust the amount of liquid to achieve your desired consistency.

Tip: If you want colored icing, divide the icing into separate bowls and add a few drops of food coloring to each.

Get Creative:

Use the icing to pipe on faces, ears, and other details. You can also add sprinkles, candy eyes, or other decorations to personalize your bunnies.

Tip: Let the icing dry completely before adding any additional decorations.

Enjoy!

Your adorable Gingerbread Bunny Cookies are ready to be enjoyed! Share them with friends and family, or simply indulge in a springtime treat yourself.

Additional Tips:

  • For a richer flavor, use dark brown sugar instead of granulated sugar.
  • If you don’t have a bunny-shaped cookie cutter, you can use another Easter-themed shape, such as an egg or chick.
  • The cookies can be stored in an airtight container at room temperature for up to 3 days.

With these simple steps and helpful tips, you can easily whip up a batch of these adorable and delicious Gingerbread Bunny Cookies. So, get baking and enjoy the taste of spring!

Bake Up a Showstopper: The Easiest Pear and Frangipane Tart for Easter

Spring is in the air, and Easter is just around the corner! This year, ditch the stress of complicated desserts and impress your guests with this effortlessly elegant Pear and Frangipane Tart.

Not only is it stunningly beautiful, but it’s also surprisingly easy to make, even for beginner bakers. The buttery, flaky crust pairs perfectly with the smooth, almond-flavored frangipane filling and the juicy sweetness of the pears, creating a truly delightful dessert experience.

Here’s what you’ll need:

For the Crust:

  • 1 1/4 cups all-purpose flour
  • 1/2 teaspoon salt
  • 1/2 cup (1 stick) cold unsalted butter, cubed
  • 3-4 tablespoons ice water

For the Frangipane:

  • 1/2 cup unsalted butter, softened
  • 1/2 cup granulated sugar
  • 2 large eggs
  • 1/2 cup almond flour
  • 1/4 cup all-purpose flour
  • 1/4 teaspoon almond extract

For the Topping:

  • 2-3 ripe pears, thinly sliced
  • Apricot jam, warmed (optional)
  • Sliced almonds (optional)

Instructions:

1. Make the Crust:

In a large bowl, whisk together the flour and salt. Using a pastry cutter or your fingertips, cut the cold butter into the flour mixture until it resembles coarse crumbs.

Gradually add the ice water, 1 tablespoon at a time, tossing with a fork until the dough just comes together. Be careful not to overmix!

Shape the dough into a disc, wrap it in plastic wrap, and refrigerate for at least 30 minutes.

2. Preheat the Oven and Prepare the Pan:

Preheat your oven to 375°F (190°C). Grease a 9-inch tart pan with removable bottom.

3. Roll Out the Dough:

On a lightly floured surface, roll out the chilled dough into a circle about 1/4 inch thick.

Gently transfer the dough to the prepared tart pan, pressing it into the bottom and sides. Trim any excess dough around the edges.

4. Blind Bake the Crust (Optional):

For a crispier crust, pre-bake the empty tart shell. Line the dough with parchment paper and fill it with pie weights or dried beans.

Bake for 15-20 minutes, or until the edges are lightly golden brown. Remove the weights and parchment paper and let the crust cool slightly.

5. Make the Frangipane:

In a large bowl, cream together the softened butter and sugar until light and fluffy. Beat in the eggs one at a time, then stir in the almond flour, all-purpose flour, and almond extract until just combined.

6. Fill the Tart:

Pour the frangipane filling into the cooled tart shell. Smooth out the top with a spatula.

7. Arrange the Pears:

Arrange the thinly sliced pears over the frangipane filling, in a fan-like pattern or any way you like.

8. Bake the Tart:

Bake the tart for 45-50 minutes, or until the frangipane is golden brown and set.

9. Cool and Serve:

Let the tart cool completely on a wire rack before serving.

Tips:

  • If your pears are very juicy, you can toss them with a sprinkle of cornstarch before arranging them on the tart to prevent excess leaking.
  • For an extra touch of sweetness and shine, brush the cooled tart with warmed apricot jam.
  • To add a bit of crunch, sprinkle the top of the tart with sliced almonds before baking.
  • This tart can be stored at room temperature for up to 2 days, or in the refrigerator for up to 4 days.

**With its simple ingredients and easy-to-follow instructions, this Pear and Frangipane Tart is the perfect

Double Chocolate Espresso Cookies: The Easiest (and Most Delicious) Easter Dessert

Calling all chocolate lovers and coffee enthusiasts! This Easter, ditch the complicated desserts and whip up a batch of these divine Double Chocolate Espresso Cookies. They’re incredibly easy to make, bursting with rich chocolate flavor, and have a touch of espresso that adds a delightful depth of flavor.

Ingredients:

  • 1 cup (2 sticks) unsalted butter, softened
  • 1 cup granulated sugar
  • 1/2 cup packed light brown sugar
  • 2 large eggs
  • 1 teaspoon pure vanilla extract
  • 1 1/2 cups all-purpose flour
  • 3/4 cup unsweetened cocoa powder
  • 1 teaspoon baking soda
  • 1/2 teaspoon salt
  • 1 cup semisweet chocolate chips
  • 1/2 cup chopped dark chocolate (optional)
  • 1 tablespoon instant espresso powder (or strongly brewed coffee)

Instructions:

1. Cream the butter and sugars:

In a large bowl using an electric mixer, cream together the softened butter, granulated sugar, and light brown sugar on medium speed until light and fluffy, about 3 minutes.

2. Beat in the eggs and vanilla:

Beat in the eggs one at a time, then stir in the vanilla extract until well combined.

3. Dry ingredients:

In a separate medium bowl, whisk together the flour, cocoa powder, baking soda, and salt.

4. Combine wet and dry ingredients:

Gradually add the dry ingredients to the wet ingredients, mixing on low speed until just combined. Don’t overmix!

5. Stir in the chocolate and espresso:

Stir in the semisweet chocolate chips, chopped dark chocolate (if using), and instant espresso powder until evenly distributed.

6. Scoop and bake:

Preheat your oven to 375°F (190°C). Line baking sheets with parchment paper. Scoop the cookie dough onto the prepared baking sheets, leaving about 2 inches of space between each cookie.

7. Bake and cool:

Bake the cookies for 10-12 minutes, or until the edges are golden brown and the centers are slightly soft. Let the cookies cool on the baking sheets for a few minutes before transferring them to a wire rack to cool completely.

Tips:

  • For chewier cookies, bake for 10 minutes. For crispier cookies, bake for 12 minutes.
  • Let the cookie dough chill in the refrigerator for 30 minutes before baking for thicker cookies.
  • Feel free to substitute milk chocolate chips or white chocolate chips for the semisweet chocolate chips.
  • Drizzle melted white chocolate or dark chocolate over the cooled cookies for an extra decadent touch.
  • Store the cookies in an airtight container at room temperature for up to 3 days.

These Double Chocolate Espresso Cookies are the perfect Easter treat that everyone will love. They’re easy to make, incredibly delicious, and sure to satisfy your sweet tooth!

Dive into Delight: Easy Coconut Cream Pie with Toasted Meringue – The Perfect Easter Treat!

Spring is in the air, and Easter celebrations are just around the corner! This year, ditch the boxed desserts and impress your family and friends with a homemade masterpiece – our Easy Coconut Cream Pie with Toasted Meringue. This recipe is not only deliciously decadent, but also surprisingly simple to make, perfect for bakers of all skill levels.

Gather your ingredients:

  • For the Crust:
  • 1 1/4 cups all-purpose flour
  • 1/2 teaspoon salt
  • 1/2 cup (1 stick) cold unsalted butter, cubed
  • 3-4 tablespoons ice water
  • For the Filling:
  • 1 1/2 cups whole milk
  • 1/2 cup granulated sugar
  • 1/4 cup cornstarch
  • 3 large egg yolks
  • 1/4 teaspoon salt
  • 1 teaspoon vanilla extract
  • 1 (14-ounce) can unsweetened coconut milk
  • 1/2 cup sweetened shredded coconut
  • For the Toasted Meringue:
  • 3 large egg whites
  • 1/4 teaspoon cream of tartar
  • 6 tablespoons granulated sugar

Let’s Bake!

Making the Pie Crust:

  1. Whisk together the dry ingredients: In a medium bowl, whisk together the flour and salt.

  2. Cut in the butter: Using a pastry cutter or your fingers, work the cold butter into the dry ingredients until the mixture resembles coarse crumbs.

  3. Add the ice water: Gradually add the ice water, 1 tablespoon at a time, tossing with a fork until the dough just comes together. Be careful not to overmix.
  4. Form and chill the dough: Shape the dough into a disc, wrap it in plastic wrap, and refrigerate for at least 30 minutes.

Prepping the Filling:

  1. Whisk together the wet ingredients: In a medium saucepan, whisk together the milk, sugar, cornstarch, egg yolks, salt, and vanilla extract.
  2. Cook over medium heat: Cook the mixture over medium heat, whisking constantly, until it thickens and begins to bubble.
  3. Stir in the coconut: Remove the pan from the heat and stir in the coconut milk and shredded coconut. Let the mixture cool slightly.

H3: Assembling the Pie:

  1. Preheat the oven: Preheat your oven to 375°F (190°C).
  2. Blind bake the crust (optional): For a flakier crust, pre-bake the empty pie crust for 10-15 minutes, then remove from the oven and let cool slightly.
  3. Pour in the filling: Pour the cooled coconut cream filling into the prepared pie crust.

Creating the Toasted Meringue:

  1. Whip the egg whites: In a clean, grease-free bowl, whisk the egg whites with the cream of tartar until soft peaks form.
  2. Gradually add the sugar: Gradually add the sugar, 1 tablespoon at a time, whisking constantly until stiff peaks form and the sugar is completely dissolved.
  3. Spread and toast: Spoon the meringue over the pie filling, spreading it to the edges. Using a kitchen torch, lightly toast the meringue peaks until golden brown. Alternatively, place the pie under the oven broiler for 2-3 minutes, watching

Spring into Flavor with these Easy Strawberry Lemonade Bars! 

These delightful Strawberry Lemonade Bars are the perfect way to celebrate Easter! They’re bursting with fresh strawberry flavor and have a tangy lemon twist that will tantalize your taste buds. Plus, they’re incredibly easy to make, so even novice bakers can whip them up in no time.

Ingredients:

  • For the Crust:
  • 1 1/2 cups all-purpose flour
  • 1/2 cup powdered sugar
  • 1/2 cup unsalted butter, softened
  • For the Filling:
  • 1 1/2 cups fresh strawberries, sliced
  • 1 cup granulated sugar
  • 1/4 cup cornstarch
  • 1/4 teaspoon salt
  • 3 large eggs
  • 1/2 cup fresh lemon juice
  • 1 tablespoon lemon zest

Instructions:

Making the Crust

  1. Preheat your oven to 350°F (175°C) and line an 8×8 inch baking pan with parchment paper.
  2. In a large bowl, cream together the flour, powdered sugar, and softened butter using a hand mixer or electric mixer until the mixture resembles coarse crumbs.
  3. Press the crumb mixture evenly into the bottom of the prepared baking pan.
  4. Bake the crust for 15-20 minutes, or until lightly golden brown.

Preparing the Filling

  1. While the crust is baking, prepare the filling. In a blender, combine the sliced strawberries, sugar, cornstarch, salt, eggs, lemon juice, and lemon zest.
  2. Blend until smooth and well combined.

Assembling and Baking the Bars

  1. Once the crust is baked, remove it from the oven and carefully pour the filling over the top.
  2. Bake for an additional 25-30 minutes, or until the filling is set and no longer jiggly.

Cooling and Serving

  1. Let the bars cool completely in the pan at room temperature for at least 2 hours.
  2. Once cool, dust the top of the bars with powdered sugar for an extra touch of sweetness and beauty.
  3. Cut the bars into squares and enjoy!

Tips:

  • For a richer flavor, use brown sugar instead of granulated sugar in the crust.
  • If you don’t have fresh strawberries, you can use frozen strawberries that have been thawed and drained.
  • To prevent the filling from browning too much, you can cover the bars loosely with foil during the last 10 minutes of baking.
  • These bars are best served chilled, so store them in the refrigerator for up to 3 days.

With their vibrant colors, delicious flavors, and easy preparation, these Strawberry Lemonade Bars are sure to be a hit at your Easter celebration!

I hope you enjoy this recipe! Be sure to share your creations on social media using the hashtag #StrawberryLemonadeBars.

Tiramisu Layer Cake: An Easy and Elegant Easter Dessert

Who can resist the classic flavors of tiramisu? This Easter, why not take your dessert game to the next level with a stunning and delicious tiramisu layer cake? It’s easier to make than you think, and it’s sure to impress your family and friends.

Ingredients:

  • For the cake:
  • 1 box (18.25 oz) vanilla cake mix
  • 3 large egg whites
  • 1/3 cup vegetable oil
  • 1 1/3 cups water
  • 2 teaspoons instant coffee powder
  • 1/2 cup strong brewed coffee
  • 3 tablespoons Kahlúa (optional)
  • For the coffee syrup:
  • 1/2 cup strong brewed coffee
  • 1/4 cup granulated sugar
  • 1 tablespoon Kahlúa (optional)
  • For the mascarpone filling:
  • 8 ounces mascarpone cheese, softened
  • 1/2 cup powdered sugar
  • 1 teaspoon vanilla extract
  • 1 cup heavy whipping cream, cold
  • For the frosting (optional):
  • 2 cups heavy whipping cream, cold
  • 1/4 cup confectioners’ sugar
  • 2 tablespoons Kahlúa (optional)
  • For garnish:
  • Unsweetened cocoa powder
  • Semi-sweet chocolate, for shaving

Instructions:

Preheat the oven and prepare the pans

  1. Preheat your oven to 350°F (175°C). Grease and flour three 9-inch round cake pans.

Make the cake batter

  1. In a large bowl, beat the cake mix, egg whites, vegetable oil, and water with an electric mixer on medium speed until well combined, about 2 minutes.

Create the coffee flavored cake layer

  1. Divide 2/3 of the batter between 2 of the prepared pans. Stir the instant coffee powder into the remaining batter, then pour it into the third pan.

Bake the cake layers

  1. Bake the cakes for 23-28 minutes, or until a toothpick inserted into the center comes out clean. Let the cakes cool in the pans for 10 minutes, then turn them out onto wire racks to cool completely.

Make the coffee syrup

  1. While the cakes cool, combine the coffee, sugar, and Kahlúa (if using) in a saucepan. Heat over medium heat until the sugar dissolves, then remove from heat and let cool slightly.

Make the mascarpone filling

  1. In a large bowl, beat the mascarpone cheese, powdered sugar, and vanilla extract until smooth. In a separate bowl, whip the heavy cream to stiff peaks. Gently fold the whipped cream into the mascarpone mixture.

Assemble the cake

  1. Place one cake layer on a serving plate. Brush the top with the coffee syrup. Spread half of the mascarpone filling over the cake. Top with the second cake layer, brush with coffee syrup, and spread the remaining filling. Top with the third cake layer and brush with the remaining coffee syrup.

Frost the cake (optional)

  1. If using frosting, whip the heavy cream with the confectioners’ sugar and Kahlúa (if using) until stiff peaks form. Frost the sides and top of the cake.

Garnish the cake

  1. Dust the top of the cake with cocoa powder and chocolate shavings.

Tips:

  • For a stronger coffee flavor, use espresso instead of brewed coffee.
  • If you don’t have Kahlúa, you can use rum extract or almond extract instead.
  • Let the cake chill in the refrigerator for at least 30 minutes before serving. This will allow the flavors to meld and the cake to set.
  • This cake can be stored in the refrigerator for up to 3 days.

Enjoy your delicious and impressive Tiramisu Layer Cake!

I hope you enjoy this easy and delicious recipe for Tiramisu Layer Cake. It’s the perfect way to celebrate Easter with your loved ones.

 S’mores Easter Egg Hunts: The Most Fun (and Delicious) Easter Treat Ever!** An Easy and Adorable Dessert Recipe for Kids (and Adults)

Easter egg hunts are a cherished tradition, but this year, why not add a sweet twist? These adorable S’mores Easter Egg Hunts are not only fun to find, but they’re also delicious to eat! This recipe is so easy that even the little ones can help make them, making it a perfect activity for the whole family.

Ingredients:

  • Large marshmallows (1 for each egg)
  • Chocolate bars (1 for each egg, broken into pieces)
  • Graham crackers (crushed)
  • Plastic Easter eggs

Instructions:

H3: Prepare the Eggs

  1. Gather your supplies. You’ll need large marshmallows, chocolate bars broken into pieces, crushed graham crackers, and plastic Easter eggs.

H3: Assemble the S’mores

  1. Toast the marshmallows. You can toast the marshmallows over a campfire, using a gas stovetop, or even in the microwave (be careful not to overcook them!).
  2. Fill the eggs. Place a toasted marshmallow inside each egg, followed by a piece of chocolate and a sprinkle of graham cracker crumbs.

H3: Hide and Seek!

  1. Hide the eggs. Just like a traditional Easter egg hunt, hide the S’mores-filled eggs outside or indoors.

H3: Enjoy the Treat!

  1. Let the hunt begin! Once the eggs are hidden, let the kids loose to find their sweet treats. They’ll love the surprise of discovering a delicious S’more inside each egg.

Tips:

  • For a fun twist, use different colored chocolate bars and pastel-colored marshmallows.
  • If you don’t have a campfire or stovetop, you can toast the marshmallows in the microwave for 10-15 seconds on high power. Just be careful not to overcook them, or they will melt.
  • To make the eggs even more festive, decorate them with Easter stickers or markers before hiding them.

These S’mores Easter Egg Hunts are sure to be a hit with kids and adults alike. They’re a fun and easy way to add a little sweetness to your Easter celebration.

I hope you enjoy this recipe! Let me know in the comments below what your favorite Easter traditions are.

Peach Melba Pavlova: An Easy and Elegant Easter Dessert

Get ready to impress your Easter guests with this stunning and surprisingly easy Peach Melba Pavlova! This delightful dessert features a light and airy meringue base, topped with whipped cream, fresh peaches, raspberries, and a sweet raspberry sauce. It’s the perfect combination of sweet and tart, and it’s sure to be a crowd-pleaser.

Ingredients:

  • For the meringue:
  • 4 large egg whites, at room temperature
  • A pinch of salt
  • 1 cup (200g) granulated sugar
  • 1 teaspoon white vinegar
  • 2 teaspoons cornstarch
  • 2 teaspoons vanilla extract
  • For the toppings:
  • 600ml double cream (heavy whipping cream)
  • 2 tablespoons icing sugar
  • 1 teaspoon vanilla extract
  • 2-3 ripe peaches, sliced
  • 2 cups fresh raspberries
  • Raspberry sauce, store-bought or homemade (optional)

Instructions:

Making the Meringue:

  1. Preheat the oven to 150°C (300°F) and line a baking sheet with parchment paper.
  2. In a clean, dry bowl, whisk the egg whites with a pinch of salt until soft peaks form.
  3. Gradually add the sugar, one tablespoon at a time, whisking continuously until stiff peaks form and the sugar is completely dissolved. This may take several minutes.
  4. Whisk in the white vinegar, cornstarch, and vanilla extract until just combined.
  5. Spoon the meringue mixture onto the prepared baking sheet, shaping it into a circle or freeform shape. Make a slight indentation in the center of the meringue to hold the toppings.
  6. Bake for 1 hour and 15 minutes, or until the meringue is dry and crisp on the outside and slightly soft on the inside.
  7. Turn off the oven and leave the meringue to cool completely in the oven with the door slightly ajar. This will prevent the meringue from cracking.

Making the Whipped Cream and Assembling the Pavlova:

  1. Once the meringue is cool, whip the cream, icing sugar, and vanilla extract in a chilled bowl until stiff peaks form.
  2. Carefully transfer the meringue to a serving plate.
  3. Spread a layer of whipped cream over the meringue, leaving a border around the edge.
  4. Top the whipped cream with sliced peaches and raspberries.
  5. Drizzle with raspberry sauce, if desired.

Tips:

  • For a richer flavor, use brown sugar instead of white sugar in the meringue.
  • If you don’t have fresh peaches, you can use canned peaches, but be sure to drain them well.
  • To make your own raspberry sauce, simply puree fresh raspberries with a little bit of sugar.
  • This dessert is best served shortly after assembling, as the meringue will soften over time.

With its impressive presentation and delicious flavors, this Peach Melba Pavlova is sure to be the star of your Easter feast!

I hope you enjoy this recipe! Be sure to share your photos and creations on social media using the hashtag #PeachMelbaPavlova.

Exit mobile version