Easy Rainbow Layer Cake: The Perfect Easter Dessert!

A Recipe Sure to Bring Smiles to Every Face!

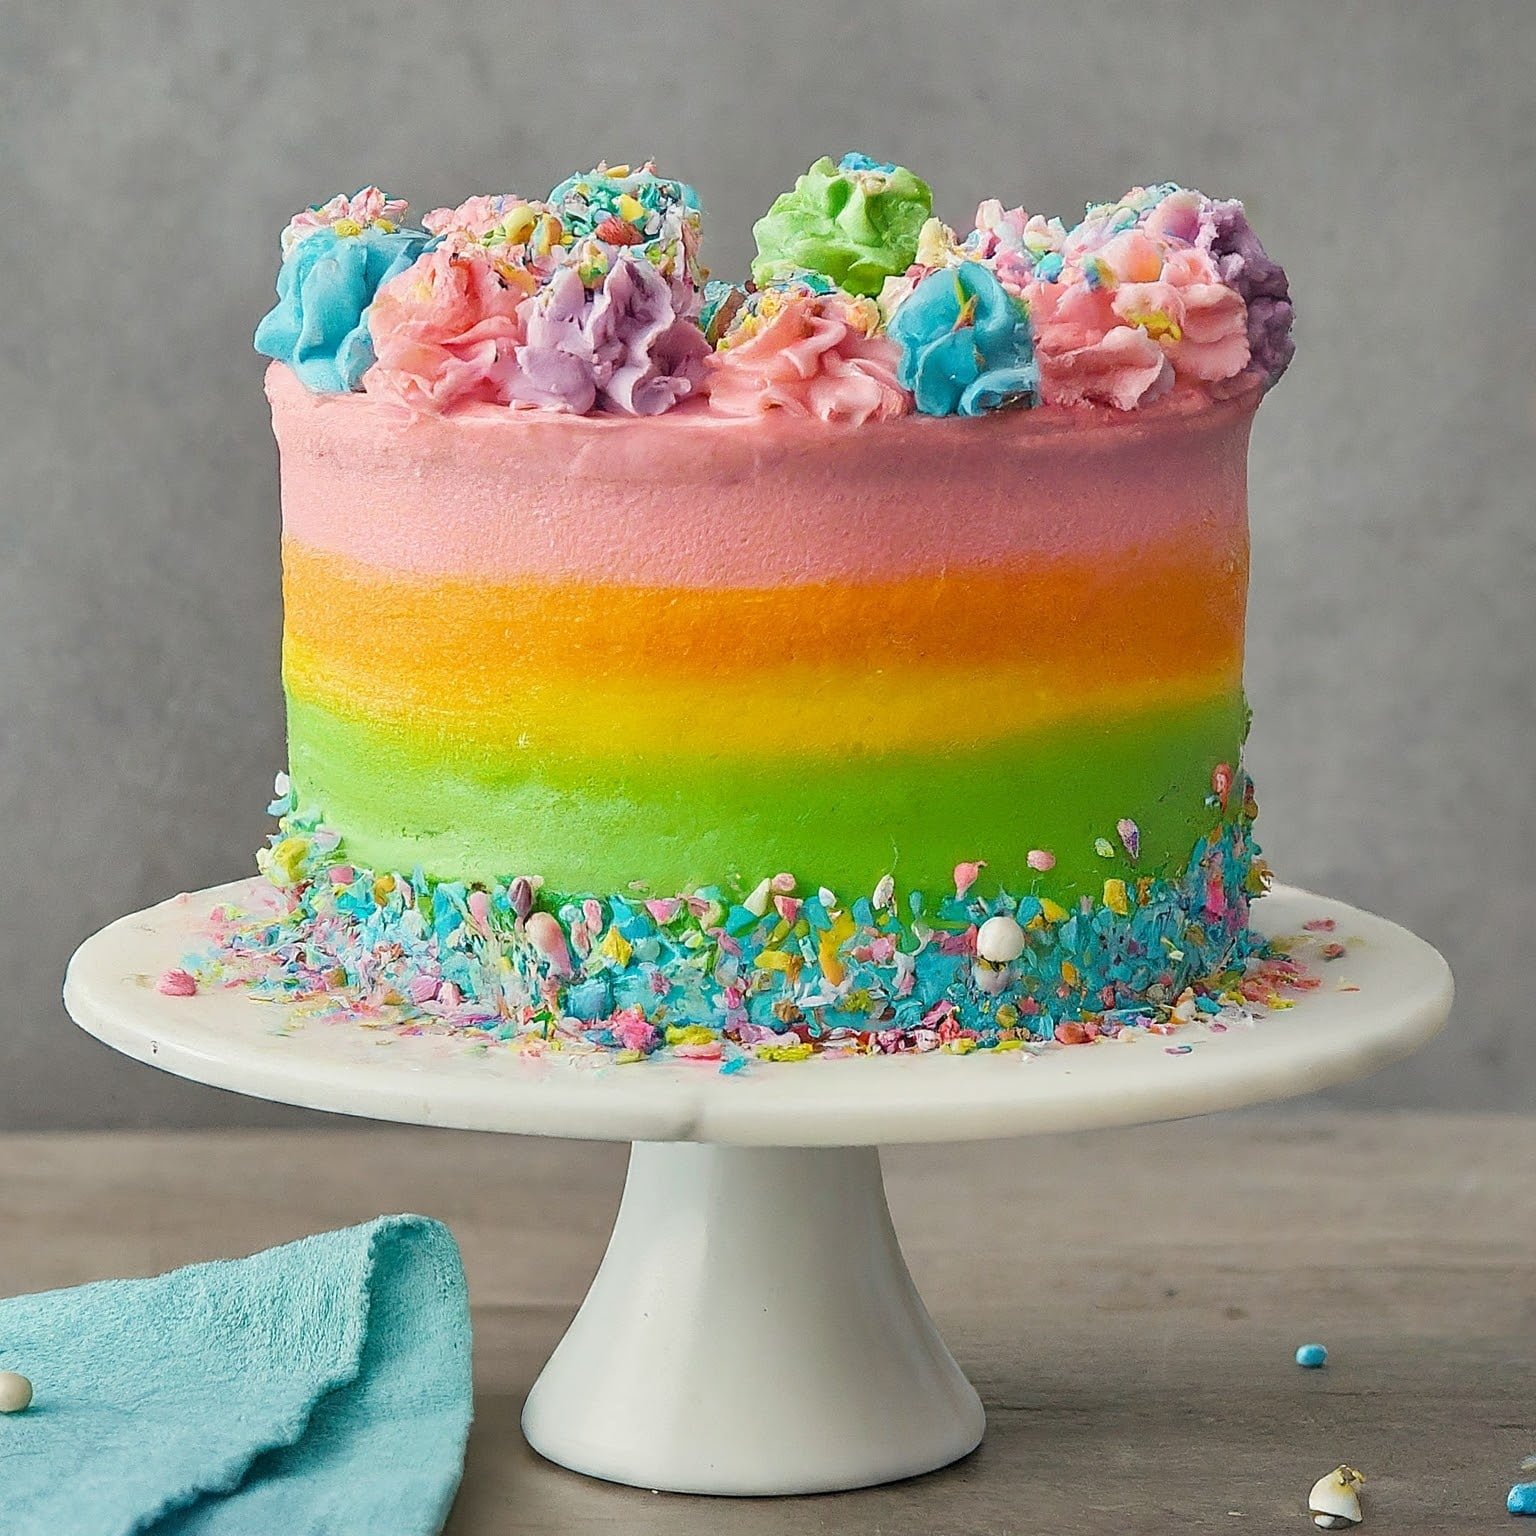
Spring is in the air, and Easter is just around the corner! What better way to celebrate than with a showstopping dessert that’s both delicious and eye-catching? This Easy Rainbow Layer Cake is the perfect recipe for the occasion. It’s surprisingly simple to make, even for beginner bakers, and the vibrant colors are sure to wow your guests.

Here’s what you’ll need:

Ingredients:

  • For the cake:
  • 1 box (16.25 oz) vanilla cake mix
  • 1 1/3 cups water
  • 1/3 cup vegetable oil
  • 3 large eggs
  • Gel food coloring (red, orange, yellow, green, blue, purple)
  • For the frosting:
  • 1 cup (2 sticks) unsalted butter, softened
  • 3 cups powdered sugar
  • 1/4 teaspoon salt
  • 1 teaspoon vanilla extract
  • 3-4 tablespoons milk
  • Sprinkles for decorating (optional)

Instructions:

H3: Preheat the oven and prepare the pans

  1. Preheat your oven to 350°F (175°C). Grease and flour three 8-inch round cake pans.

H3: Make the cake batter

  1. In a large bowl, beat together the cake mix, water, oil, and eggs with an electric mixer on medium speed for 2 minutes, or until smooth.
  1. Divide the batter evenly among six bowls. Add a few drops of gel food coloring to each bowl, and mix until each batter is a vibrant color: red, orange, yellow, green, blue, and purple.

H3: Bake the cake layers

  1. Pour each colored batter into a separate prepared cake pan. Bake for 17-20 minutes, or until a toothpick inserted into the center comes out clean.
  1. Let the cakes cool in the pans for 10 minutes, then transfer them to wire racks to cool completely.

H3: Make the frosting

  1. In a large bowl, cream together the softened butter and powdered sugar until light and fluffy. Beat in the salt and vanilla extract.
  2. Gradually add the milk, one tablespoon at a time, until the frosting reaches desired consistency.

H3: Assemble the cake

  1. Once the cake layers are cool, place one layer on a cake plate or stand. Spread a thin layer of frosting over the top. Repeat with the remaining layers, alternating the colors.
  2. Frost the entire cake with the remaining frosting. Decorate with sprinkles, if desired.

H3: Tips for success:

  • For even brighter colors, use gel food coloring instead of liquid food coloring.
  • If your cake layers dome slightly, you can carefully level them using a serrated knife before frosting.
  • To prevent the frosting from becoming too soft, make sure your butter is softened, but not melted.
  • This cake can be stored at room temperature for up to 2 days, or in the refrigerator for up to 4 days.

Enjoy your delicious and festive Easter dessert!

I hope you love this easy and fun recipe! It’s a great way to add a touch of magic to your Easter celebration. And don’t forget to share your photos of your creations on social media using the hashtag #RainbowLayerCake.

Happy baking!

Peppermint Patty Stuffed Chocolate Cookies: The Easiest (and Most Delicious) Easter Treat

These Peppermint Patty Stuffed Chocolate Cookies are the perfect Easter dessert! They’re easy to make, only require a few ingredients, and are sure to be a hit with everyone who tries them. The combination of rich chocolate cookies and refreshing peppermint patties is simply irresistible.

Ingredients:

  • 1 1/3 cups all-purpose flour
  • 1/3 cup unsweetened cocoa powder
  • 1/2 teaspoon baking soda
  • 1/4 teaspoon salt
  • 1/2 cup unsalted butter, softened
  • 1/2 cup light brown sugar
  • 1 large egg
  • 1 teaspoon vanilla extract
  • 16-18 miniature peppermint patties, unwrapped

Instructions:

Making the Cookie Dough

  1. In a medium bowl, whisk together the flour, cocoa powder, baking soda, and salt.
  2. In a large bowl, cream together the butter and sugar until light and fluffy. Beat in the egg and vanilla extract until well combined.
  3. Gradually add the dry ingredients to the wet ingredients, mixing until just combined.

Chilling the Dough (Optional)

  1. This step is optional, but chilling the dough for at least 30 minutes will help the cookies to spread less and be chewier.

Shaping and Baking the Cookies [Imagen of A close-up photo of a hand pressing a peppermint patty into the center of a flattened ball of chocolate cookie dough]

  1. Preheat oven to 350°F (175°C). Line baking sheets with parchment paper.
  2. Scoop out dough by tablespoons and roll into balls. Flatten each ball slightly and press a peppermint patty into the center.
  3. Fold the dough around the peppermint patty, making sure it is completely enclosed.
  4. Place the cookies on the prepared baking sheets, leaving a few inches between each cookie.

Baking Tips

  • For chewier cookies, bake for 10-12 minutes.
  • For crispier cookies, bake for 12-14 minutes.
  • Let the cookies cool on the baking sheets for a few minutes before transferring them to a wire rack to cool completely.

Decorating the Cookies (Optional)

  1. Once the cookies are cool, you can decorate them with melted chocolate, sprinkles, or other Easter-themed decorations.

Tips:

  • If your dough is too sticky, you can add a tablespoon of flour at a time until it is easier to handle.
  • Be sure to chill the dough if you want the cookies to be chewier.
  • Don’t overbake the cookies, or they will be dry and crumbly.
  • Let the cookies cool completely before decorating them.

These Peppermint Patty Stuffed Chocolate Cookies are sure to be a crowd-pleaser! They’re the perfect Easter treat that is both easy to make and delicious. So why not give them a try?

I hope you enjoy this recipe! If you have any questions, please feel free to leave a comment below.

Happy Easter!

Bird’s Nest Brownie Bites: The Easiest and Most Adorable Easter Dessert

Get ready to be the star of your Easter gathering with these adorable and incredibly easy Bird’s Nest Brownie Bites. They are the perfect sweet treat for kids and adults alike, and they are sure to impress everyone with their cute and festive appearance.

Ingredients:

  • 1 box (48 squares) milk chocolate baking squares
  • 1 (14.5 oz) package sweetened shredded coconut
  • 1 bag (10 oz) mini Robin chocolate eggs (or your favorite Easter candy)

Instructions:

Making the Brownie Nests:

  1. Melt the chocolate: In a microwave-safe bowl, melt the milk chocolate squares on medium power, stirring every 30 seconds, until smooth and melted.
  1. Shape the nests: Using a spoon, drop heaping tablespoons of melted chocolate onto a baking sheet lined with parchment paper. Use the back of the spoon to spread the chocolate into circular shapes, creating slight indentations in the center for the “eggs”.
  1. Chill and harden: Place the baking sheet in the refrigerator for 15-20 minutes, or until the chocolate is firm.

Adding the Finishing Touches:

  1. Decorate with coconut: Gently press shredded coconut around the edges of the hardened chocolate nests, creating the “bird’s nest” effect.
  1. Add the “eggs”: Place 2-3 mini Robin chocolate eggs (or your favorite Easter candy) in the center of each nest.

Tips:

  • For a richer chocolate flavor, use dark chocolate baking squares instead of milk chocolate.
  • If you don’t have mini Robin chocolate eggs, you can use any other type of Easter candy or even jelly beans.
  • To make the nests ahead of time, you can store them in the refrigerator for up to 2 days.
  • Get creative with the “eggs”! You can use different colors and types of candy to add variety to your bird’s nests.

These Bird’s Nest Brownie Bites are the perfect way to celebrate Easter and add a touch of whimsy to your dessert table. They are so easy to make, and they are sure to be a crowd-pleaser!

Enjoy!

I hope you enjoy this recipe! Be sure to share your creations on social media using the hashtag #BirdsNestBrownieBites. I can’t wait to see your photos!

Creamy Pistachio Fluff Salad: The Easiest (and Most Delicious) Easter Dessert

Spring is in the air, and Easter is just around the corner! This year, ditch the stress of complicated desserts and whip up this Creamy Pistachio Fluff Salad instead. It’s so easy to make, it practically makes itself (seriously, it only takes 5 minutes!), and it’s guaranteed to be a crowd-pleaser.

This delightful dessert is bursting with flavor and texture. The creamy pistachio pudding base is studded with juicy pineapple chunks, pillowy marshmallows, and crunchy chopped pistachios. It’s the perfect combination of sweet, refreshing, and oh-so-satisfying.

Here’s what you’ll need:

  • 1 (3.4-ounce) package instant pistachio pudding mix
  • 1 (20-ounce) can crushed pineapple (undrained)
  • 1 (12-ounce) container frozen whipped topping, thawed
  • 1 cup chopped pistachios
  • 1 cup miniature marshmallows

Making it is a breeze:

Whip Up the Creamy Base

  1. In a large bowl, whisk together the instant pistachio pudding mix and the crushed pineapple (including the juice!). Make sure the pudding mix is well combined with the pineapple juice, so it forms a smooth and creamy base.

Fold in the Goodness

  1. Gently fold in the thawed whipped topping and the miniature marshmallows. Be careful not to overmix, as you want to keep the fluff light and airy.

Top it Off with a Pistachio Punch

  1. Finally, fold in the chopped pistachios. These add a delightful crunch and a vibrant pop of green color to your salad.

Chill and Enjoy!

  1. Cover the bowl and refrigerate for at least 2 hours, or until chilled and set.

Tips for a Stellar Salad:

  • For an extra pop of flavor, use fresh chopped pistachios instead of pre-chopped ones.
  • If you don’t have whipped topping, you can use homemade whipped cream instead.
  • Feel free to experiment with other fruits! Chopped grapes, mandarin oranges, or even diced strawberries would be delicious additions.
  • Get creative with your presentation! Serve the salad in individual bowls or a decorative trifle dish. Top it with maraschino cherries, a sprig of mint, or a sprinkle of chopped pistachios for an extra touch of elegance.

This Creamy Pistachio Fluff Salad is the perfect way to end your Easter feast on a light and refreshing note. It’s simple to make, incredibly delicious, and sure to be a hit with everyone at the table. So ditch the stress and whip up this delightful dessert for a truly special Easter celebration!

Hop into Spring with Adorable Chocolate-Dipped Strawberry Carrots!

Spring has sprung, and what better way to celebrate than with a fun and festive dessert? These adorable chocolate-dipped strawberry carrots are the perfect treat for Easter gatherings, spring potlucks, or even just a sweet springtime snack.

They’re incredibly easy to make, requiring only a few simple ingredients and minimal effort. Plus, they’re sure to be a hit with kids and adults alike. So, gather your supplies and get ready to create these delightful treats!

Ingredients:

  • 1 pound fresh strawberries, hulled and dried
  • 12 ounces melting chocolate (white, milk, or dark, your choice!)
  • Green candy melts (optional)
  • Fresh parsley or mint leaves (optional, for garnish)

Instructions:

Melt the Chocolate

  • In a double boiler or heat-resistant bowl set over a pot of simmering water, melt the chocolate according to package instructions. Be sure to stir frequently to prevent burning.

Tip: If you don’t have a double boiler, you can melt the chocolate in the microwave in short bursts, stirring in between, until smooth and melted.

Dip the Strawberries

  • One by one, gently dip each strawberry into the melted chocolate, coating it completely.

Tip: To avoid drips, tap the strawberry gently on the side of the bowl to remove any excess chocolate.

Let the Chocolate Harden

  • Place the dipped strawberries on a baking sheet lined with parchment paper. Allow them to cool and harden completely, which takes about 30 minutes at room temperature or 15 minutes in the refrigerator.

Create the Carrot Tops (Optional)

  • While the chocolate is hardening, melt the green candy melts according to package instructions.

Tip: If you don’t have green candy melts, you can use chopped green candy or even a few drops of green food coloring added to melted white chocolate.

  • Once the chocolate-dipped strawberries are hardened, use a spoon or piping bag to drizzle a small amount of green candy melt onto the top of each strawberry to create the carrot tops.

Tip: For a more realistic look, use a toothpick to create small lines in the green candy melt to resemble carrot leaves.

Garnish and Serve (Optional)

  • For an extra touch of whimsy, garnish the finished chocolate-dipped strawberry carrots with fresh parsley or mint leaves.

Serve your adorable chocolate-dipped strawberry carrots chilled and enjoy!

Additional Tips:

  • For a fun twist, you can use different colored melting chocolate to create different colored carrots.
  • Get creative with the carrot tops! You can use chopped pistachios, green sprinkles, or even dried green tea leaves.
  • These chocolate-dipped strawberry carrots are best enjoyed within 24 hours, as the strawberries will start to soften over time.

With these simple tips and tricks, you’re sure to create the most adorable and delicious chocolate-dipped strawberry carrots that will be the star of the show at your next Easter celebration!

I hope you enjoy this fun and festive Easter treat!

Pastel Meringue Kisses: The Easiest (and Cutest) Easter Treat!

Calling all bakers, both novice and experienced! Spring is here, and with it comes the joy of Easter celebrations. This year, ditch the complicated desserts and whip up a batch of these adorable Pastel Meringue Kisses. They’re light, airy, and melt-in-your-mouth delicious, making them the perfect sweet treat for any Easter gathering.

Why You’ll Love This Recipe:

  • Simple and Easy: This recipe requires only a handful of ingredients and minimal effort, making it perfect for bakers of all skill levels.
  • Completely Customizable: Feel free to get creative with the colors! Use any pastel shades you like to match your Easter décor or simply choose your favorites.
  • Light and Refreshing: These meringue kisses are the perfect ending to a heavier Easter meal. They’re light, airy, and not overly sweet.
  • Kid-Friendly: Get the little ones involved in the fun! Piping the meringue is a great way to keep them entertained, and they’ll love helping to decorate the finished product.

Ingredients:

  • 3 large egg whites, at room temperature
  • 1/4 teaspoon cream of tartar
  • 1 cup granulated sugar
  • Food coloring (optional)

Equipment:

  • Mixing bowl
  • Electric mixer with whisk attachment
  • Baking sheet
  • Parchment paper
  • Piping bag (optional)
  • Piping tip (optional)

Instructions:

Preheat the Oven and Prepare the Baking Sheet

  1. Preheat your oven to 200°F (93°C). Line a baking sheet with parchment paper.

Whip the Egg Whites

  1. In a clean, grease-free bowl, add the egg whites and cream of tartar. Using an electric mixer fitted with the whisk attachment, beat the egg whites on medium speed until soft peaks form.

Tips:

  • Make sure your bowl and whisk are completely clean and free of any grease or oil, as this can prevent the egg whites from whipping properly.
  • For best results, use egg whites that are at room temperature.

Gradually Add the Sugar

  1. With the mixer on medium speed, gradually add the sugar, one tablespoon at a time, until all the sugar has been incorporated.

Tips:

  • Adding the sugar slowly is important to ensure that it dissolves completely and the meringue reaches the stiff peak stage.
  • If the sugar is not fully dissolved, your meringue kisses will be grainy.

Beat Until Stiff Peaks Form

  1. Increase the mixer speed to high and continue beating until the meringue reaches stiff peaks. This means that when you lift the whisk, the peaks will hold their shape and not droop.

Tips:

  • It may take several minutes to reach stiff peaks, so be patient.
  • You can test the meringue by rubbing a small amount between your thumb and forefinger. If it feels gritty, the sugar is not fully dissolved and you need to continue beating.

 Add Food Coloring (Optional)

  1. If you want to make your meringue kisses pastel-colored, divide the meringue into separate bowls and add a few drops of food coloring to each bowl. Use a rubber spatula to gently fold the food coloring into the meringue until evenly distributed.

Tips:

  • Start with a small amount of food coloring and add more until you reach the desired shade.
  • Gel food coloring will give you the most vibrant colors.

 Pipe or Spoon the Meringue

  1. If you are using a piping bag, spoon the meringue into the bag fitted with a desired piping tip. Alternatively, you can simply spoon the meringue onto the prepared baking sheet. Create small dollops, leaving space between them for spreading.

Tips:

  • If you don’t have a piping bag, you can use a spoon to create small dollops of meringue.
  • Make sure to leave space between the meringue kisses, as they will spread slightly while baking.

Adorable and Easy: Coconut Macaroon Nests with Jelly Beans 

The Perfect Easter Treat Everyone Will Love!

Spring is here, and Easter is just around the corner! This year, ditch the complicated desserts and whip up a batch of these adorable and easy Coconut Macaroon Nests. They’re packed with flavor, fun to make, and perfect for sharing with friends and family.

Ingredients:

  • 4 large egg whites
  • 1/2 teaspoon salt
  • 1 cup granulated sugar
  • 1 (14-ounce) package sweetened shredded coconut
  • 1/2 cup white chocolate chips, melted
  • 1 cup assorted jelly beans

Instructions:

Preheat the oven to 350°F (175°C). Line a baking sheet with parchment paper.

Whisk the egg whites and salt together in a large bowl until soft peaks form. Gradually add the sugar, one tablespoon at a time, while continuing to whisk until stiff peaks form.

Gently fold the coconut into the egg white mixture until just combined. Be careful not to overmix, as this can make the macaroons tough.

Using a spoon or cookie scoop, drop heaping tablespoons of the mixture onto the prepared baking sheet. Leave about 2 inches of space between each macaroon to allow for spreading.

Use your thumb or the back of a spoon to gently press a shallow indentation in the center of each macaroon to create a “nest” shape.

Bake for 15-20 minutes, or until the macaroons are golden brown. Let cool completely on the baking sheet.

Once the macaroons are cool, drizzle them with melted white chocolate.

While the chocolate is still wet, gently press a few jelly beans into the center of each nest.

Tips:

  • For a fun twist, you can tint the coconut with a few drops of food coloring before adding it to the egg white mixture.
  • If you don’t have white chocolate chips, you can use melted dark chocolate or even melted butter.
  • Get creative with your jelly beans! Use a variety of colors and shapes to add some personality to your nests.

These Coconut Macaroon Nests are sure to be a hit at your Easter celebration! They’re easy to make, fun to decorate, and absolutely delicious.

Enjoy!

Additional Tips:

  • To make sure your macaroons are perfectly golden brown, keep an eye on them during baking. If they start to brown too quickly, reduce the oven temperature to 325°F (165°C).
  • Let the macaroons cool completely on the baking sheet before decorating them. This will help the chocolate to harden properly.
  • If you don’t have a cookie scoop, you can use a spoon to measure out the macaroon dough. Just be sure to make sure all of the macaroons are roughly the same size.
  • Store the finished macaroons in an airtight container at room temperature for up to 3 days.

I hope you enjoy this recipe! Be sure to share your creations on social media using the hashtag #EasterMacaroons.

Glazed Blueberry Scones: The Easiest (and Most Delicious) Easter Treat!

Easter brunch is all about spending time with loved ones, enjoying delicious food, and celebrating new beginnings. This year, ditch the store-bought pastries and impress everyone with these Glazed Blueberry Scones! They’re incredibly easy to make, bursting with juicy blueberries, and have a delightful sweetness that’s perfect for any Easter gathering.

Key Ingredients:

  • 2 cups all-purpose flour
  • ½ cup granulated sugar
  • 1 tablespoon baking powder
  • 1 teaspoon salt
  • 1 stick (8 tablespoons) cold unsalted butter, cubed
  • 1 large egg, beaten
  • ½ cup heavy cream
  • 1 teaspoon vanilla extract
  • 1 ½ cups fresh or frozen blueberries
  • ¼ cup powdered sugar (for glaze)
  • 1-2 tablespoons milk (for glaze)

Making Magic in the Kitchen:

Step 1: Preheat and Prep

  • Preheat your oven to 400°F (200°C) and line a baking sheet with parchment paper. This will prevent sticking and make cleanup a breeze!

Step 2: Dry Ingredients Fiesta

  • In a large bowl, whisk together the flour, sugar, baking powder, and salt.

Step 3: Gettin’ Buttery

  • Using a pastry cutter or your fingers, cut the cold butter into the dry ingredients until the mixture resembles coarse crumbs.

Tip: Cold butter is crucial for creating those flaky layers we all love in scones!

Step 4: The Wet Goods

  • In a separate bowl, whisk together the beaten egg, heavy cream, and vanilla extract.

Step 5: Bringing it all Together

  • Gently fold the wet ingredients into the dry ingredients, then add the blueberries. Be careful not to overmix, as this can make your scones tough.

Step 6: Shaping Up

  • Turn the dough out onto a lightly floured surface and pat it into a disc about 1-inch thick.

Step 7: Slice and Bake

  • Use a sharp knife to cut the dough into 8 wedges.

Step 8: Oven Time!

  • Transfer the scones to the prepared baking sheet, leaving an inch of space between each one. Bake for 20-25 minutes, or until golden brown.

Step 9: The Sweetest Touch (Glaze)

  • While the scones are still warm, whisk together the powdered sugar and milk until smooth. Drizzle the glaze over the warm scones and enjoy!

Bonus Tip: For an extra Easter touch, you can sprinkle some lemon zest or edible Easter sprinkles over the glaze before it sets.

These Glazed Blueberry Scones are guaranteed to be a crowd-pleaser! They’re perfect for Easter brunch, a special afternoon snack, or even a delightful dessert. So, grab your ingredients, preheat your oven, and get ready to bake up some delicious memories this Easter!

Luscious Lemon Pound Cake: The Perfect Easy Easter Dessert

Spring is in the air, and Easter is just around the corner! This year, ditch the stress of complicated desserts and whip up this incredibly easy and luscious lemon pound cake. It’s bursting with bright lemon flavor, perfectly moist, and sure to be a crowd-pleaser.

Ingredients:

  • 2 ¾ cups granulated sugar
  • 1 cup unsalted butter, softened
  • 6 large eggs
  • 3 cups cake flour, sifted
  • ¼ teaspoon baking soda
  • 1 cup unwhipped whipping cream
  • 1 teaspoon lemon extract
  • Zest of 1 lemon

Instructions:

Preheat the Oven and Prepare the Pan:

  1. Preheat your oven to 350°F (175°C). Grease and flour a 9×5 inch loaf pan. This will help ensure your cake comes out easily after baking.

Cream the Butter and Sugar:

  1. In a large mixing bowl, cream together the softened butter and sugar until light and fluffy. This step incorporates air into the batter, resulting in a light and airy cake.

Whisk in the Eggs:

  1. One at a time, whisk in the eggs, making sure to fully incorporate each egg before adding the next. This ensures even distribution of the eggs throughout the batter.

Dry Ingredients and Wet Ingredients:

  1. In a separate bowl, whisk together the sifted cake flour and baking soda.

  2. Alternately add the dry ingredients and the whipping cream to the wet ingredients, beginning and ending with the dry ingredients. Mix until just combined, being careful not to overmix. Overmixing can lead to a tough cake.

Lemon Flavor Magic:

  1. Finally, stir in the lemon extract and zest. The zest adds a wonderful burst of fresh lemon flavor, while the extract provides a deeper, more complex lemon taste.

Bake and Cool:

  1. Pour the batter into your prepared loaf pan and bake for 65-75 minutes, or until a toothpick inserted into the center comes out clean.
  2. Let the cake cool in the pan for 10 minutes before transferring it to a wire rack to cool completely.

Tips for Luscious Lemon Perfection:

  • For an extra lemony kick, use a combination of granulated sugar and freshly squeezed lemon juice in the glaze.
  • If you don’t have cake flour, you can make your own by whisking 3 tablespoons of cornstarch into 1 cup of all-purpose flour.
  • To prevent the cake from browning too quickly, tent it loosely with aluminum foil halfway through baking.
  • Let the cake cool completely before glazing or frosting to prevent the glaze or frosting from melting.

Glaze and Enjoy!

Once your cake is completely cool, you can glaze it with a simple powdered sugar glaze or your favorite frosting.

This Luscious Lemon Pound Cake is the perfect way to celebrate Easter or any other special occasion. It’s easy to make, bursting with flavor, and sure to be a hit with everyone who tries it!

I hope you enjoy this recipe! Let me know in the comments below what your favorite Easter dessert is.

Hop into Spring with the Cutest Bunny-Shaped Sugar Cookies!

Spring is hopping in, and what better way to celebrate than with adorable bunny-shaped sugar cookies? These delightful treats are easy to make, fun to decorate, and perfect for Easter gatherings, school bake sales, or just a sweet springtime snack.

Ingredients:

  • 1 cup (2 sticks) unsalted butter, softened
  • 1 cup granulated sugar
  • 2 large eggs
  • 1 teaspoon vanilla extract
  • 3 cups all-purpose flour
  • 1 teaspoon baking powder
  • 1/2 teaspoon salt
  • White frosting (store-bought or homemade)
  • Food coloring (optional)
  • Sprinkles, chocolate chips, or other decorating supplies (optional)

Instructions:

Cream the butter and sugar:

In a large bowl using a hand mixer or stand mixer fitted with the paddle attachment, cream together the softened butter and sugar until light and fluffy. This will take about 3 minutes.

Beat in the eggs and vanilla:

Beat in the eggs one at a time, then stir in the vanilla extract. Mix until well combined.

Dry ingredients:

In a separate bowl, whisk together the flour, baking powder, and salt. Gradually add the dry ingredients to the wet ingredients, mixing on low speed until just combined. Be careful not to overmix the dough.

Chill the dough:

Wrap the dough in plastic wrap and chill in the refrigerator for at least 30 minutes. This will help the cookies keep their shape when baking.

Preheat the oven:

Preheat your oven to 375°F (190°C). Line baking sheets with parchment paper.

Roll out the dough:

On a lightly floured surface, roll out the dough to a thickness of about 1/4 inch.

Cut out the bunny shapes:

Use a bunny-shaped cookie cutter to cut out shapes from the dough.

Important Tip: If the dough is too sticky, place it back in the refrigerator for a few minutes to firm up.

Bake the cookies:

Transfer the cookie cutouts to the prepared baking sheets, leaving a little space between them. Bake for 8-10 minutes, or until the edges are golden brown.

Cool the cookies:

Let the cookies cool completely on a wire rack before decorating.

Decorate the cookies:

Once the cookies are cool, it’s time for the fun part – decorating! You can use store-bought white frosting or make your own. If you’d like colored frosting, divide the frosting into bowls and tint them with food coloring.

Here are some ideas for decorating your bunny cookies:

  • Pipe on eyes, noses, and mouths with frosting.
  • Add chocolate chips for noses and eyes.
  • Use pink frosting for the ears and cheeks.
  • Sprinkle with colorful sprinkles.
  • Get creative and add other decorations like edible flowers, candy melts, or coconut flakes.
Exit mobile version