Apple Cinnamon Roll Cake: The Easiest (and Most Delicious) Easter Dessert

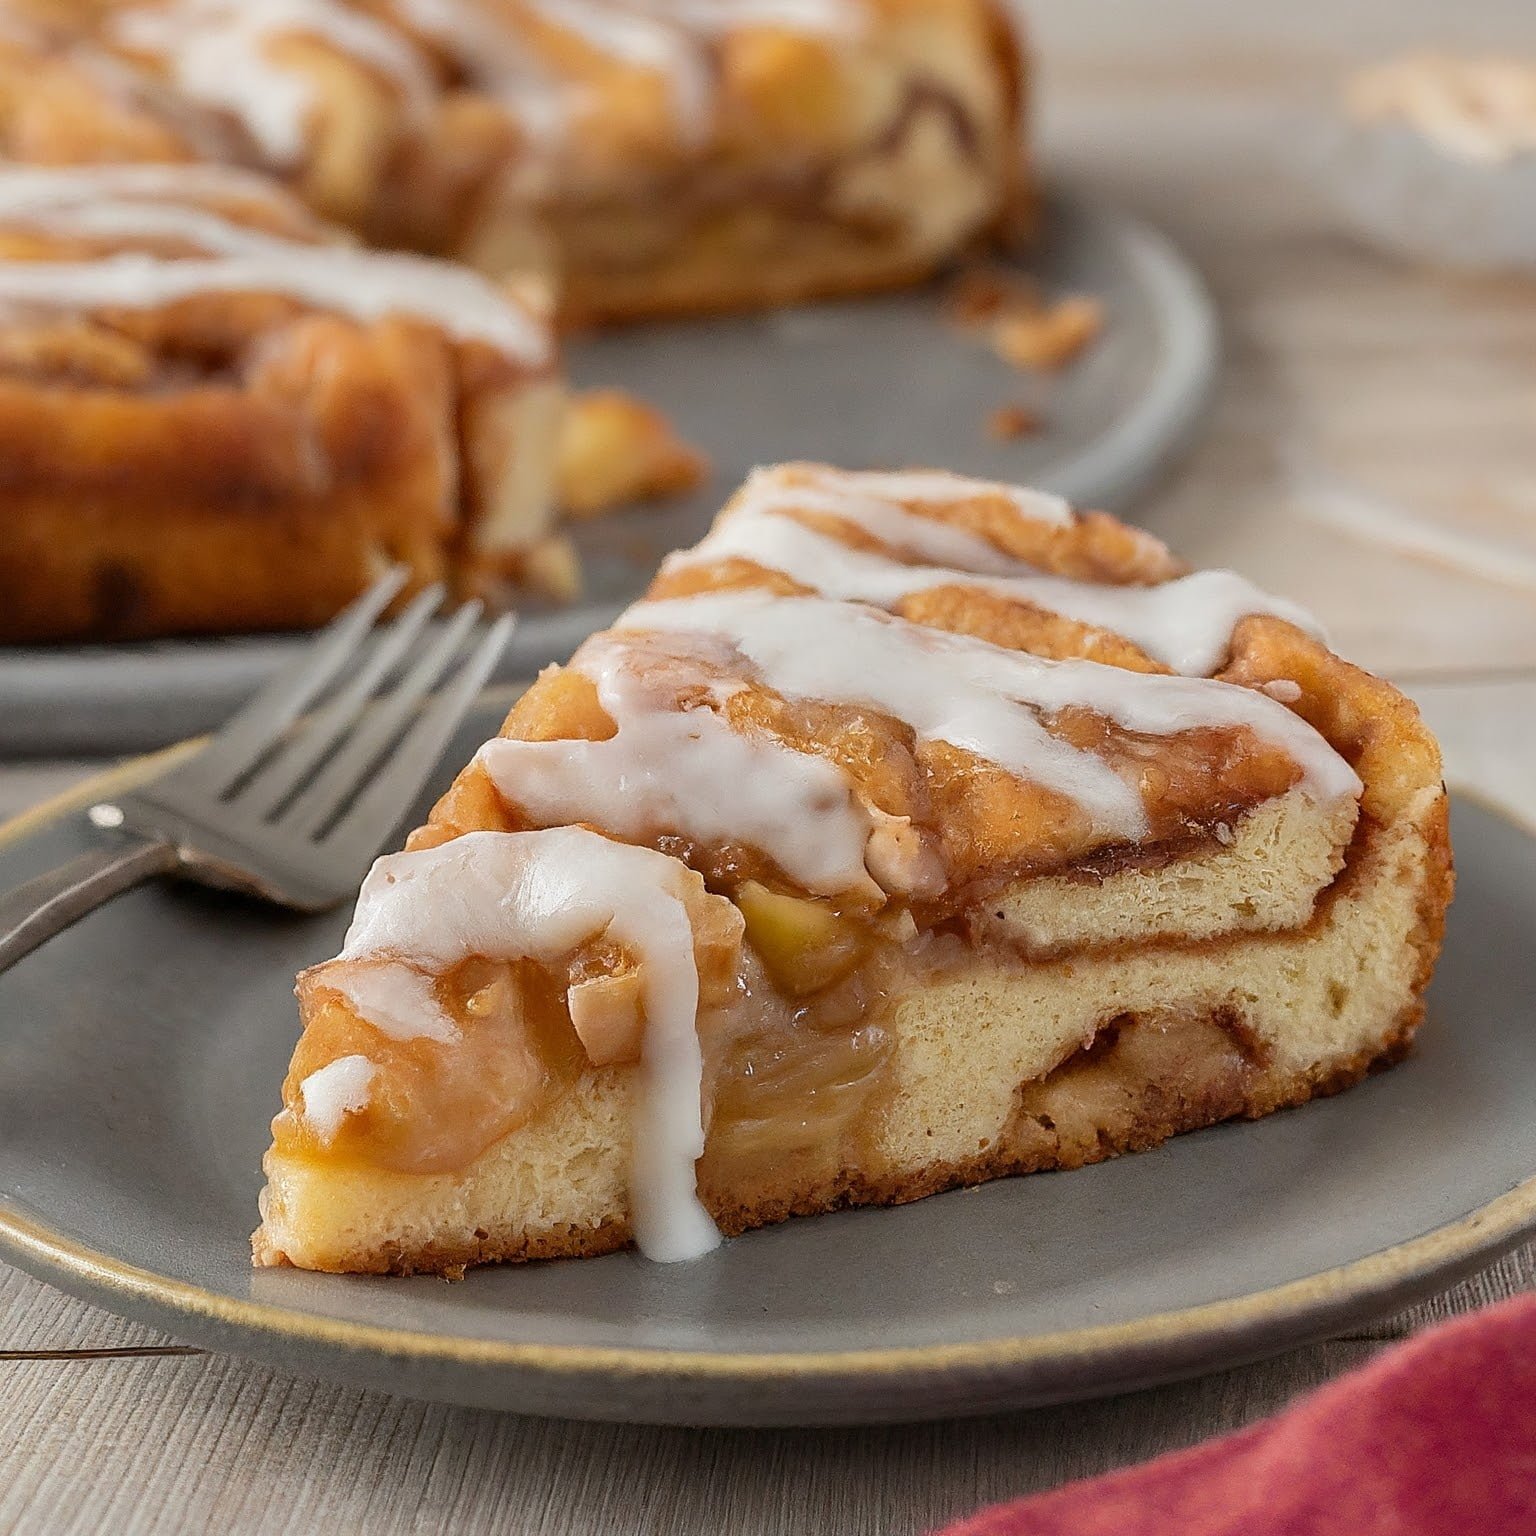
Spring is in the air, and Easter is just around the corner! This year, ditch the stress of complicated desserts and whip up this Apple Cinnamon Roll Cake – a guaranteed crowd-pleaser that’s easy enough for anyone to make.

Ingredients:

  • For the cake:
  • 3 cups all-purpose flour
  • 1 cup granulated sugar
  • 1/2 teaspoon salt
  • 3 1/2 teaspoons baking powder
  • 2 large eggs
  • 1 1/2 cups milk
  • 1 1/2 teaspoons vanilla extract
  • 4 tablespoons unsalted butter, melted
  • For the filling:
  • 2-3 medium apples (peeled, cored, and diced)
  • 1/4 cup granulated sugar
  • 1 tablespoon cornstarch
  • 1 teaspoon ground cinnamon
  • For the cinnamon swirl:
  • 1 cup unsalted butter, softened
  • 1 cup light brown sugar
  • 1 tablespoon ground cinnamon
  • For the vanilla glaze (optional):
  • 2 cups powdered sugar
  • 4-5 tablespoons milk
  • 1 teaspoon vanilla extract

Instructions:

Preheat the oven to 350°F (175°C). Grease and line a 9×13 inch baking pan with parchment paper.

Making the apple filling:

  1. In a medium bowl, combine the diced apples, sugar, cornstarch, and cinnamon. Toss to coat evenly. Set aside.

Making the cinnamon swirl:

  1. In a separate bowl, cream together the softened butter and brown sugar until light and fluffy. Beat in the cinnamon until well combined.

Making the cake batter:

  1. In a large bowl, whisk together the flour, sugar, salt, and baking powder. In a separate bowl, whisk together the eggs, milk, and vanilla extract.
  2. Gradually add the wet ingredients to the dry ingredients, mixing until just combined. Don’t overmix!
  3. Gently fold in the melted butter.

Assembling the cake:

  1. Pour half of the cake batter into the prepared pan. Spread the apple filling evenly over the batter.
  2. Dollop spoonfuls of the cinnamon swirl mixture over the apple filling.
  3. Carefully pour the remaining cake batter over the top, spreading evenly.

Swirling the magic:

  1. Using a knife or skewer, gently swirl the cinnamon filling into the batter to create a marbled effect. Be careful not to overmix.

Baking and cooling:

  1. Bake the cake for 35-40 minutes, or until a toothpick inserted into the center comes out clean. Let the cake cool completely in the pan on a wire rack.

Making the vanilla glaze (optional):

  1. In a small bowl, whisk together the powdered sugar, milk, and vanilla extract until smooth and pourable. Drizzle the glaze over the cooled cake, if desired.

Tips:

  • For a richer flavor, use brown butter in the cinnamon swirl. To brown butter, melt it over medium heat in a saucepan, swirling the pan occasionally until the butter turns golden brown and develops a nutty aroma.
  • If your apples are very juicy, you may want to increase the cornstarch to 1 1/2 tablespoons to prevent the filling from being too runny.
  • Let the cake cool completely before frosting to prevent the frosting from melting.
  • This cake is best served at room temperature, but can also be stored in the refrigerator for up to 3 days.

Enjoy this delicious and festive Apple Cinnamon Roll Cake for Easter brunch, dessert, or any time you’re craving a sweet treat!

Happy baking!

Hop into Spring with Adorable Sweet & Salty Pretzel Bunnies!

Calling all Easter dessert enthusiasts and anyone who loves a sweet and salty treat! These adorable Sweet and Salty Pretzel Bunnies are the perfect addition to your Easter festivities. They’re incredibly easy to make, require minimal ingredients, and are guaranteed to be a hit with both kids and adults.

Ingredients:

  • 1 bag (14.3 oz) pretzel twists
  • 1 bag (12 oz) white candy melts
  • Pink candy melts (optional)
  • Black candy eyes (optional)
  • Sprinkles (optional)

Instructions:

###Melting the Candy Melts

  1. Prepare a baking sheet: Line a baking sheet with parchment paper. This will make cleaning up a breeze!
  2. Melt the white candy melts: Place the white candy melts in a microwave-safe bowl and heat in 30-second intervals, stirring after each interval, until melted and smooth. Be careful not to overheat, as this can cause the candy melts to seize.

Tip: If you don’t have a microwave, you can melt the candy melts in a heatproof bowl set over a pan of simmering water, stirring constantly until melted.

###Assembling the Bunnies

  1. Decorate the pretzels: Dip the bottom half of each pretzel twist into the melted white chocolate. Gently tap off any excess chocolate and place the pretzel on the prepared baking sheet.
  2. Create the ears: While the chocolate is still wet, gently press two pretzel twists upright onto the decorated half of the first pretzel, forming the bunny ears.

Tip: You can use different sized pretzel twists for the ears and body to create different sized bunnies.

  1. Add features (optional): Once the chocolate has set, use pink candy melts or sprinkles to create a cute bunny nose, and add black candy eyes for a finishing touch.

Tip: Get creative with the decorations! You can use edible glitter, chopped nuts, or even mini marshmallows to add personality to your bunnies.

  1. Let the chocolate set: Allow the chocolate to set completely before storing or serving. This can take about 15-20 minutes at room temperature.

Enjoy!

Your adorable Sweet and Salty Pretzel Bunnies are now ready to be enjoyed! They’re perfect for Easter baskets, party snacks, or simply a sweet and salty treat.

Additional Tips:

  • For a richer flavor, you can use milk chocolate or dark chocolate candy melts instead of white chocolate.
  • If you don’t have candy melts, you can use white chocolate chips or melting wafers. Just be sure to melt them carefully according to the package instructions.
  • These bunnies can be stored in an airtight container at room temperature for up to 3 days.

So hop to it and create these delightful treats! They’re sure to be a spring sensation!

Key Lime Pie Bars: Easy Easter Dessert Recipe

Spring is in the air, and Easter is just around the corner! What better way to celebrate than with a delicious and refreshing dessert? These Key Lime Pie Bars are the perfect answer. They’re easy to make, bursting with bright citrus flavor, and sure to be a hit with everyone at your Easter gathering.

Ingredients:

  • For the crust:
  • 1 ½ cups graham cracker crumbs (about 12 full graham crackers)
  • ¼ cup granulated sugar
  • 6 tablespoons unsalted butter, melted
  • For the filling:
  • 4 ounces cream cheese, softened to room temperature
  • 14-ounce can sweetened condensed milk
  • ½ cup freshly squeezed key lime juice (about 4-5 limes)
  • 2 large egg yolks
  • 1 teaspoon lime zest (optional)
  • For the topping (optional):
  • Whipped cream
  • Lime slices

Instructions:

H3: Making the Crust

  1. Preheat your oven to 350°F (175°C). Line a 9×13 inch baking pan with parchment paper.
  2. In a medium bowl, combine the graham cracker crumbs, sugar, and melted butter. Stir until well combined.
  3. Press the crumb mixture evenly into the bottom of the prepared baking pan.
  4. Bake the crust for 10 minutes, or until golden brown. Remove from the oven and let cool completely.

H3: Making the Filling

  1. In a large bowl, beat the cream cheese with an electric mixer until smooth and creamy.
  2. Add the sweetened condensed milk, key lime juice, egg yolks, and lime zest (if using) and beat until well combined and smooth.

H3: Assembling the Bars

  1. Pour the filling over the cooled crust.
  2. Bake for 15-20 minutes, or until the filling is just set. The center may still be slightly jiggly, but it will firm up as it cools.
  3. Remove from the oven and let cool completely at room temperature for about 1 hour. Then, refrigerate for at least 3 hours, or overnight, until the bars are completely chilled and set.

H3: Serving

  1. Cut the bars into squares and serve chilled.
  2. Top with whipped cream and a lime slice for an extra bit of fun (optional).

Tips:

  • For a richer flavor, use full-fat cream cheese.
  • If you don’t have fresh key limes, you can use bottled key lime juice. However, fresh limes will give the bars the best flavor.
  • To make sure the bars are completely set, refrigerate them overnight.
  • These bars can be stored in the refrigerator for up to 5 days.

Enjoy your delicious and refreshing Key Lime Pie Bars! They’re the perfect way to celebrate Easter or any other special occasion.

With their easy-to-follow instructions and stunning visuals, this recipe is sure to go viral and become a favorite among your readers. Happy baking!

Raspberry Ripple Ice Cream: The Perfect Easy Easter Treat!

Spring is here, and with it comes the joy of Easter celebrations! If you’re looking for a fun and festive dessert that’s both delicious and easy to make, look no further than this Raspberry Ripple Ice Cream recipe. This no-churn ice cream is perfect for anyone, from beginner cooks to seasoned pros. It’s made with simple ingredients and requires minimal prep time, making it ideal for busy Easter mornings or afternoons.

Ingredients:

  • 2 cups heavy whipping cream
  • 1 can (14 oz) sweetened condensed milk
  • 1 teaspoon vanilla extract
  • 1 cup fresh raspberries
  • 1 tablespoon powdered sugar

Instructions:

Making the Raspberry Sauce

  1. In a small saucepan, combine the fresh raspberries and powdered sugar.
  2. Heat the mixture over medium heat, stirring frequently, until the raspberries have softened and released their juices.
  3. Strain the mixture through a fine-mesh sieve to remove the seeds. Set the raspberry sauce aside to cool.

Whipping the Cream 4. In a large bowl, using an electric mixer, whip the heavy whipping cream on medium speed until stiff peaks form. 5. Gently fold in the sweetened condensed milk and vanilla extract until just combined. Be careful not to overmix, as this can make the ice cream tough.

Creating the Ripple 6. Pour half of the whipped cream mixture into a loaf pan or freezer-safe container. 7. Drizzle half of the cooled raspberry sauce over the top of the cream. 8. Use a spoon or spatula to gently swirl the sauce into the cream, creating a ripple effect. 9. Repeat steps 6-8 with the remaining whipped cream mixture and raspberry sauce.

Freezing the Ice Cream 10. Cover the container tightly with plastic wrap or foil and freeze for at least 6 hours, or overnight, until the ice cream is firm.

Tips:

  • For a richer flavor, use full-fat coconut milk instead of heavy whipping cream.
  • If you don’t have fresh raspberries, you can use frozen raspberries instead. Just thaw them completely and drain any excess liquid before using.
  • Get creative with your toppings! Chopped nuts, chocolate chips, or Easter sprinkles would all be delicious additions to this ice cream.
  • This ice cream is best enjoyed frozen, but you can let it soften at room temperature for a few minutes for a scooping consistency.

Enjoy your delicious and refreshing Raspberry Ripple Ice Cream!

This easy and delicious recipe is sure to be a hit with everyone at your Easter gathering. So ditch the store-bought desserts and whip up a batch of this homemade ice cream instead. You won’t regret it!

Speckled Egg Chocolate Cake: Easy Easter Dessert Recipe

This Easter, ditch the boxed cake mix and impress your family and friends with this stunning and deceptively easy Speckled Egg Chocolate Cake. It’s moist, rich, and packed with chocolate flavor, and the speckled egg design is sure to wow everyone at the table.

Ingredients:

  • For the cake:
  • 4 ounces milk chocolate, chopped
  • 4 ounces dark chocolate, chopped
  • 2 ½ cups all-purpose flour, sifted
  • ¼ cup cornstarch, sifted
  • 2 teaspoons baking powder
  • ½ teaspoon baking soda
  • ½ teaspoon salt
  • 1 cup whole milk
  • ½ cup sour cream
  • 5 large egg whites
  • ¼ cup vegetable oil
  • ½ cup unsalted butter, softened
  • 1 ¾ cups granulated sugar
  • 1 teaspoon vanilla extract
  • For the decoration:
  • 1 tablespoon unsweetened cocoa powder
  • 2 tablespoons rum or vodka (optional)
  • Shredded coconut
  • Chocolate eggs

Instructions:

Preheat the oven and prepare the pans

  • Preheat your oven to 350°F (175°C). Grease and flour two 8-inch round cake pans.

Melt the chocolate

  • In a heatproof bowl set over a pot of simmering water (not touching the water), melt the milk chocolate and dark chocolate together until smooth. Remove from heat and let cool slightly.

Dry ingredients

  • In a large bowl, whisk together the flour, cornstarch, baking powder, baking soda, and salt.

Wet ingredients

  • In another large bowl, whisk together the milk, sour cream, egg whites, oil, butter, sugar, and vanilla extract until well combined.

Combine wet and dry ingredients

  • Add the cooled chocolate mixture to the wet ingredients and mix until just combined. Then, gradually add the dry ingredients to the wet ingredients, mixing until no streaks of flour remain. Be careful not to overmix.

Bake the cakes

  • Divide the batter evenly between the prepared cake pans. Bake for 25-30 minutes, or until a toothpick inserted into the center comes out clean.

Cool the cakes

  • Let the cakes cool in the pans for 10 minutes, then transfer them to a wire rack to cool completely.

Make the speckled egg design

  • Once the cakes are cool, prepare the decoration. In a small bowl, whisk together the cocoa powder and rum or vodka (if using) until smooth.
  • Using a clean paintbrush, dip it into the cocoa mixture and flick it at the top of one cake layer, rotating the cake as you go to create a speckled egg effect. Repeat with the other cake layer.

Assemble the cake

  • Place one cake layer on a serving plate. Frost the top with your favorite frosting or whipped cream. Top with the second cake layer. Frost the entire cake.

Decorate the cake

  • To create a nest, press shredded coconut around the base of the cake. Top with chocolate eggs.

Tips:

  • For a richer chocolate flavor, use all dark chocolate instead of a combination of milk and dark chocolate.

Lemon Lavender Shortbread Cookies: Easy Easter Dessert Recipe

Spring is in the air, and Easter is just around the corner! What better way to celebrate than with a delicious and easy dessert recipe? These Lemon Lavender Shortbread Cookies are the perfect treat for any occasion. They are light, buttery, and have a delightful floral flavor from the lavender. Plus, they’re incredibly easy to make, so even novice bakers can whip up a batch in no time.

Ingredients:

  • 1/2 cup (1 stick) unsalted butter, softened
  • 1/4 cup granulated sugar
  • 1/4 teaspoon pure vanilla extract
  • 1 tablespoon lemon zest
  • 3/4 teaspoon culinary lavender
  • 1 cup all-purpose flour
  • 1/8 teaspoon salt

Instructions:

1. Preheat the oven to 350°F (175°C) and line a baking sheet with parchment paper.

2. Cream together the butter and sugar in a large bowl using an electric mixer until light and fluffy.

3. Beat in the vanilla extract, lemon zest, and lavender.

4. Gradually add the flour and salt, mixing on low speed until just combined.

5. The dough will be crumbly, but it should come together when pressed.

Tip: If the dough is too dry, add 1 tablespoon of milk at a time until it becomes workable.

6. Turn the dough out onto a lightly floured surface and gently knead it a few times until smooth.

7. Shape the dough into a disc and wrap it in plastic wrap.

Tip: You can chill the dough in the refrigerator for 30 minutes to make it easier to handle.

8. Roll out the dough on a lightly floured surface to 1/4-inch thickness.

9. Use cookie cutters to cut out desired shapes.

Tip: If the dough is sticky, dip the cookie cutters in flour before cutting out the shapes.

10. Place the cookies on the prepared baking sheet and bake for 10-12 minutes, or until the edges are golden brown.

11. Let the cookies cool on the baking sheet for a few minutes before transferring them to a wire rack to cool completely.

12. Dust the cookies with powdered sugar, if desired.

Tips:

  • For a stronger lavender flavor, use 1 teaspoon of culinary lavender.
  • You can also add a few drops of food coloring to the dough to make the cookies festive for Easter.
  • Store the cookies in an airtight container at room temperature for up to 3 days.

These Lemon Lavender Shortbread Cookies are sure to be a hit with everyone at your Easter gathering. They’re easy to make, delicious, and perfect for sharing with friends and family. So why not give them a try today?

I hope you enjoy this recipe!

Happy Easter!

Easter Fun: Adorable Rice Krispie Treat Bird’s Nests

Spring is hopping in, and what better way to celebrate than with a sweet and festive treat? These adorable Easter Rice Krispie Treat Bird’s Nests are sure to be a hit with kids and adults alike. They’re incredibly easy to make, requiring only a handful of ingredients and minimal prep time. Plus, they’re completely customizable, so you can let your creativity fly!

Ingredients:

  • 3 tablespoons unsalted butter
  • 6 cups mini marshmallows
  • 6 cups Rice Krispie cereal
  • 1/2 cup green sprinkles (optional)
  • 1 bag (10 oz) milk chocolate candy eggs
  • Marshmallow Peeps (optional)

Instructions:

Melt the Butter and Marshmallows

  1. In a large pot, melt the butter over low heat.
  2. Add the marshmallows and stir constantly until they are completely melted and smooth.

Add the Cereal and Mix

  1. Remove the pot from the heat and add the Rice Krispie cereal.
  2. Gently fold the cereal into the marshmallow mixture until it is evenly coated.

Shape the Nests

  1. Lightly grease your hands or a spoon with cooking spray.
  2. Scoop the Rice Krispie treat mixture into your hands and gently press it into greased muffin tins, forming a well in the center of each to create a nest shape.

Decorate and Enjoy!

  1. While the nests are still warm, sprinkle them with green sprinkles (optional) to resemble grass.
  2. Once the nests have cooled completely, gently press a few chocolate candy eggs into each nest.
  3. For an extra adorable touch, add a marshmallow Peep bird to each nest.

Tips:

  • If the mixture is too sticky to handle, let it cool slightly before shaping the nests.
  • You can use any color sprinkles you like to decorate the nests.
  • Get creative with your candy decorations! You can use jelly beans, chocolate bunnies, or any other Easter-themed candies you like.
  • These treats are best enjoyed fresh, but they can be stored in an airtight container at room temperature for up to 3 days.

With just a few simple steps, you can create these delightful Easter Rice Krispie Treat Bird’s Nests. They’re the perfect addition to any Easter celebration or spring party. So get creative, have fun, and enjoy!

Happy Easter!

Calling All Easter Dessert Lovers: Peach Cobbler Crisp is Here to Steal the Show! 

Spring has sprung, and Easter is just around the corner! This year, ditch the ordinary and impress your guests with a dessert that’s both easy to make and bursting with flavor: Peach Cobbler Crisp!

This recipe is the perfect combination of a classic cobbler and a fruity crisp. The juicy peaches are nestled beneath a sweet and crumbly topping, creating a dessert that’s irresistibly delicious.

Here’s what you’ll need:

  • For the filling:
  • 4-5 ripe peaches, sliced
  • 1/4 cup granulated sugar
  • 1 tablespoon lemon juice
  • 1/2 teaspoon ground cinnamon
  • 1/4 teaspoon nutmeg (optional)
  • For the topping:
  • 1 cup rolled oats
  • 1/2 cup all-purpose flour
  • 1/2 cup packed light brown sugar
  • 1/4 teaspoon ground cinnamon
  • 1/4 cup cold unsalted butter, cubed

Now, let’s get baking!

H3: Preheat and Prep

  1. Preheat your oven to 375°F (190°C). Lightly grease a 9×13 inch baking dish.

H3: Make the Filling

  1. In a large bowl, combine the sliced peaches, sugar, lemon juice, cinnamon, and nutmeg (if using). Toss to coat.
  2. Pour the peach mixture into the prepared baking dish.

H3: Create the Crumble Topping

  1. In a medium bowl, combine the oats, flour, brown sugar, and cinnamon. Using a pastry cutter or your fingers, work the cold butter into the dry ingredients until a crumbly mixture forms.
  2. Sprinkle the crumble topping evenly over the peach filling.

H3: Bake to Golden Perfection

  1. Bake the cobbler crisp for 40-45 minutes, or until the filling is bubbly and the topping is golden brown.

H3: Cool, Serve, and Enjoy!

  1. Let the cobbler crisp cool slightly before serving. Enjoy it warm with a scoop of vanilla ice cream, whipped cream, or simply on its own!

Tips for a Spectacular Peach Cobbler Crisp:

  • For extra flavor: Add a splash of almond extract to the filling.
  • Don’t have fresh peaches? No problem! Canned peaches work just as well. Drain them well before using.
  • Make it ahead: You can assemble the cobbler crisp up to 24 hours in advance and store it in the refrigerator. Bake it before serving.
  • Leftovers? No worries! Store leftover cobbler crisp in the refrigerator for up to 3 days. Reheat it in the oven before serving.

With its simple ingredients and easy-to-follow instructions, this Peach Cobbler Crisp is sure to become your new go-to Easter dessert. So ditch the stress and impress your guests with this delicious and delightful treat!

Sprinkle Some Easter Magic with These Easy Cookie Bars!

Calling all bakers, both novice and experienced! Get ready to be enchanted with these Easy Easter Magic Cookie Bars. This delightful recipe is the perfect way to celebrate the spring season and bring a touch of magic to your Easter gatherings.

Why We Love This Recipe:

  • Simple and Easy: This recipe requires minimal ingredients and comes together in a flash, making it ideal for busy schedules.
  • Kid-Friendly: With its vibrant colors and playful ingredients, this recipe is sure to be a hit with the little ones. They can even help with the fun and easy decorating!
  • Customizable: Feel free to get creative and add your own favorite Easter-themed treats to the mix, like pastel-colored sprinkles or chopped candy eggs.

Ingredients:

  • 1 ½ cups graham cracker crumbs (about 14 whole crackers)
  • ½ cup unsalted butter, melted
  • 1 (14-ounce) can sweetened condensed milk
  • 1 ½ cups sweetened shredded coconut, divided
  • 1 cup semisweet chocolate chips
  • 1 cup white chocolate chips
  • 1 ½ cups pastel M&Ms

Instructions:

Preparing the Crust:

  1. Preheat your oven to 350°F (175°C) and line an 8×8 inch baking pan with parchment paper for easy removal.

  2. In a medium bowl, combine the graham cracker crumbs and melted butter. Mix well until the crumbs are evenly coated.
  3. Press the crumb mixture firmly into the bottom of the prepared baking pan.

Building the Magic:

  1. Pour the sweetened condensed milk evenly over the crust.

  2. Sprinkle half of the shredded coconut over the condensed milk.
  3. Next, add a layer of semisweet chocolate chips.

  4. Top the chocolate chips with a layer of white chocolate chips.
  5. Finally, sprinkle the remaining coconut and pastel M&Ms over the top.

Baking and Enjoying:

  1. Bake the magic bars for 20-25 minutes, or until the edges are golden brown and the center is set.
  2. Let the bars cool completely in the pan before cutting into squares and serving.

Tips and Tricks:

  • For a richer flavor, use brown butter instead of melted butter in the crust.
  • Don’t have pastel M&Ms? Use any colorful candies you have on hand.
  • To add a fun textural twist, sprinkle some chopped nuts or pretzels on top before baking.
  • These bars can be stored at room temperature in an airtight container for up to 3 days.

We hope you enjoy these magical Easter treats! Share your creations with us on social media using #EasterMagicBars.

Happy Baking!

Hop into Spring with Adorable Cinnamon Sugar Easter Bunny Twists!

Get ready to add a touch of whimsy and deliciousness to your Easter celebrations with these adorable Cinnamon Sugar Easter Bunny Twists! This easy recipe is perfect for bakers of all skill levels, and it’s sure to be a hit with kids and adults alike.

Ingredients:

  • 1 package (17.3 oz) frozen puff pastry sheets, thawed
  • 2 tablespoons melted butter
  • 1 tablespoon ground cinnamon
  • 2 tablespoons granulated sugar
  • White frosting, for decorating
  • Pink gel icing, for decorating (optional)

Instructions:

Preparing the Dough:

  1. Thaw the puff pastry: Preheat your oven to 375°F (190°C). Unfold one sheet of puff pastry dough onto a lightly floured surface. Repeat with the second sheet.

Creating the Cinnamon Sugar Filling:

  1. Combine the cinnamon sugar: In a small bowl, whisk together the melted butter, cinnamon, and sugar until well combined.

Assembling the Twists:

  1. Brush the dough: Brush the entire surface of the first puff pastry sheet with the melted butter mixture. Sprinkle the cinnamon sugar mixture evenly over the buttered dough, leaving a 1/2 inch border around the edges.

Shaping the Bunnies:

  1. Top with the second sheet: Lay the second puff pastry sheet on top of the first sheet, with the cinnamon sugar filling sandwiched in between. Press down gently to adhere the two sheets.
  2. Seal the edges: Use a fork to crimp the edges of the dough, creating a secure seal.
  3. Cut the dough: Using a sharp knife, cut the dough into 1-inch wide strips.
  4. Twist and shape: Gently twist each strip a few times, then form the bottom of the twist into a small circle (the bunny’s body). Pinch the top of the twist to create two pointed ears.

Baking the Twists:

  1. Transfer to baking sheet: Place the shaped bunny twists onto a baking sheet lined with parchment paper.
  2. Bake until golden brown: Bake the twists for 10-12 minutes, or until golden brown and puffed.

Decorating (Optional):

  1. Cool and decorate: Allow the twists to cool slightly before decorating. Use white frosting to pipe on eyes and a pink gel icing dot for the nose.

Tips:

  • For a richer flavor, brush the twists with an egg wash before baking.
  • Get creative with decorating! You can use sprinkles, chocolate chips, or colored icing to personalize your bunny twists.
  • These twists are best enjoyed fresh out of the oven, but they can also be stored in an airtight container at room temperature for up to 2 days.

Enjoy these adorable and delicious treats with your loved ones this Easter!

Happy Baking!

Let me know in the comments below what your favorite Easter treat is!

Exit mobile version